As we all know, iPad has no disks drive, so we do not watch DVD movie on iPad directly. So, if you have lots of DVD movies and would like to watch them on your new iPad, just get Aneesoft DVD to iPad Converter for Mac to rip and convert DVD movies to iPad supported video format. Here I will show you how to finish it.
Things you'll need
1. Aneesoft DVD to iPad Converter for Mac (Free for download trial version)
2. DVD movies
Step 1: Download & install Aneesoft DVD to iPad Converter for Mac
We'll be using a very nice iPad DVD ripping software called Aneesoft DVD to iPad Converter for Mac for ripping DVD movies to iPad compatible video format, head over here and download the free trial of Aneesoft DVD to iPad Converter for Mac. With this powerful iPad tool, you can easily rip and convert your DVD movies to MP4 videos ready for your iPad.
Notice:If your computer runs Windows OS, please download the windows version-Aneesoft DVD to iPad converter.
Step 2: Run Aneesoft DVD to iPad Converter for Mac and load DVD movies to convert
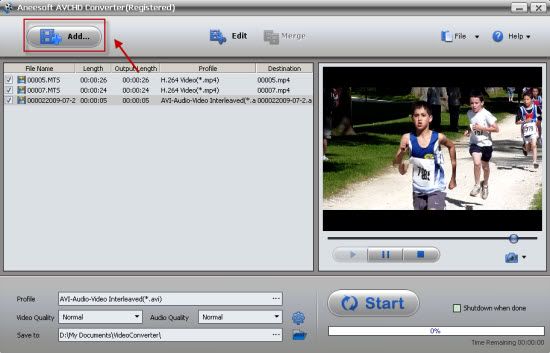
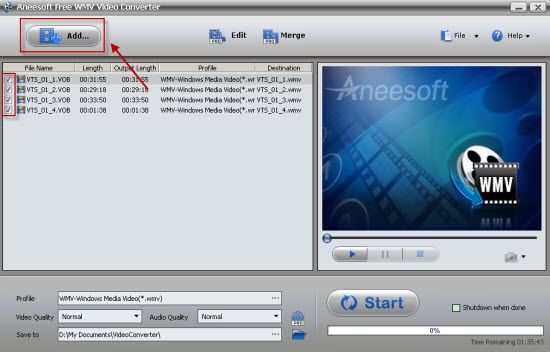
Run DVD to iPad Converter for Mac and click "Load..." button to add DVD movies that you want to convert to iPad video formats.
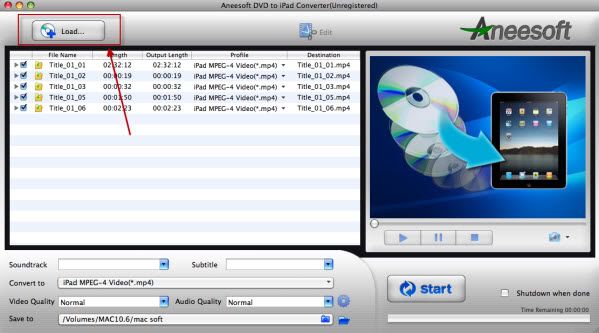
Step 3: Select the titles you'd like to convert and Set the iPad output profile format
A movie DVD usually has several titles. The shorter titles on the DVD are usually the video backgrounds used in the DVD menu screens and DVD extras like movie trailers. Unless you are a graphic artist, you probably don't want to convert these titles.
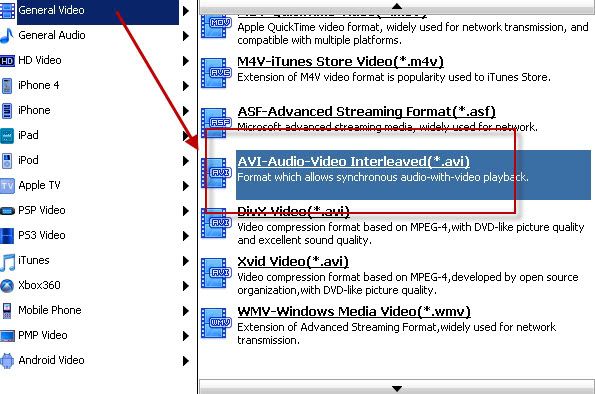
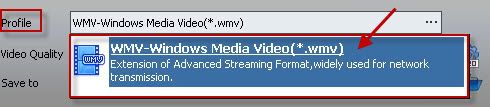
There are lots of preset iPad supported video formats available for you to choose to convert for the iPad. You can choose MPEG-4 or H264 video according to your requirement. Here we set it as "iPad H.264 (720p) MPEG4 Video (*.mp4)". You may change the video parameters in the advanced settings, such as bit rate, resolution, frame rate and more.

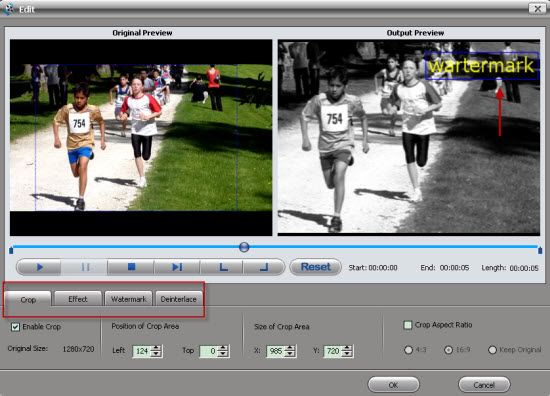
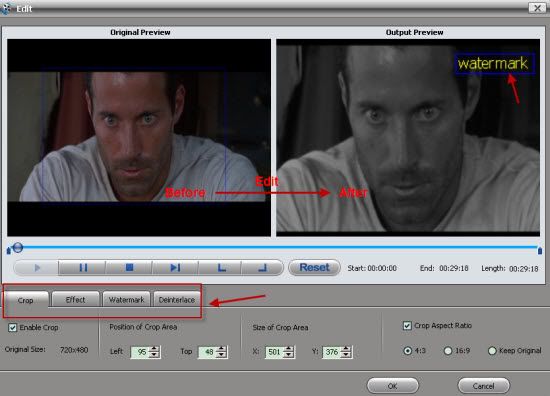
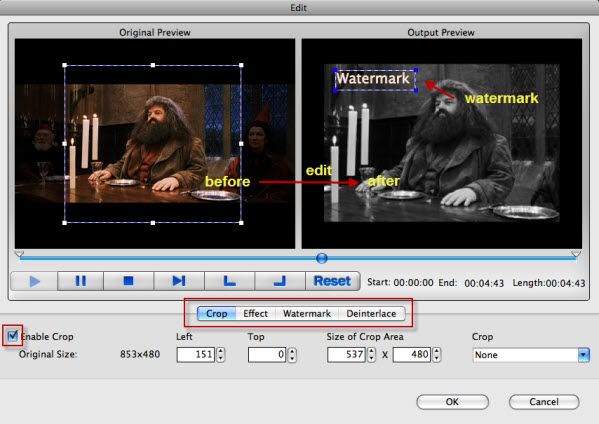
Step 4: Edit your videos: trim, crop, effect, watermark and deinterlace(optional)
This Aneesoft DVD to iPad video converter for Mac allows you to trim, crop your videos, which may help you removing the black edges around your video, so that you can watch your movies in full screen. You can also set different video effect such as grey, invert, gamma, sepia and so on, in addition, if you want to add watermark on your video, you can click "Watermark" tab and then check "Enable Effect" option box. You may add Text or Image watermark onto your video.
Step 5: Start ripping and converting DVD to iPad supported video format
Finally, click the big "Start" button to start converting DVD to iPad compatible video format. Once the convert is complete, Aneesoft DVD to iPad Converter for Mac will place on your Desktop a new iPad format version of your movies that will play on the iPad. Double-click the new file and play it to make sure it looks as you expect. If you're using the evaluation version of Aneesoft DVD to iPad Converter for Mac, it will only convert the first five minutes of your movies. You need to register it as a full-version to remove this limitation.
Step 6: Make these videos syncing to iPad
After converting DVD to iPad compatible formats, now we can import the converted files to iPad.First, you need to launch iTunes, click File option on menu, and add your converted files to iTunes library. Then, connect your iPad 4 to computer via USB cable, iTunes will detect your iPad. After that, click iTunes "File -> Sync iPad", and the files will be transferred to your iPad from iTunes library. When updating completed, you will find the videos on you iPad. Well, you can enjoy the movie on your IPad now.
You may be interested in these topics:
How to convert FLV to iPhone video
How to convert YouTube to iPhone 4 video
How to use HandBrake to rip your DVDs to iPhone for free
Best multiplayer iPad games for free download
Top 8 best iPad apps for kids
What is iPad supported video, TV & audio format
Jailbreaking for iPad
Apple iPad Frequently Asked Questions
Apple iPad Reviews: Is it as magical as Apple promised
10 iPad features you must know
The worst 10 things about iPad
iPad is best Christmas gift for Christmas 2010
The best holiday movies & Christmas movies for iPad
Things you'll need
1. Aneesoft DVD to iPad Converter for Mac (Free for download trial version)
2. DVD movies
Step 1: Download & install Aneesoft DVD to iPad Converter for Mac
We'll be using a very nice iPad DVD ripping software called Aneesoft DVD to iPad Converter for Mac for ripping DVD movies to iPad compatible video format, head over here and download the free trial of Aneesoft DVD to iPad Converter for Mac. With this powerful iPad tool, you can easily rip and convert your DVD movies to MP4 videos ready for your iPad.
Notice:If your computer runs Windows OS, please download the windows version-Aneesoft DVD to iPad converter.
Step 2: Run Aneesoft DVD to iPad Converter for Mac and load DVD movies to convert
Run DVD to iPad Converter for Mac and click "Load..." button to add DVD movies that you want to convert to iPad video formats.
Step 3: Select the titles you'd like to convert and Set the iPad output profile format
A movie DVD usually has several titles. The shorter titles on the DVD are usually the video backgrounds used in the DVD menu screens and DVD extras like movie trailers. Unless you are a graphic artist, you probably don't want to convert these titles.
There are lots of preset iPad supported video formats available for you to choose to convert for the iPad. You can choose MPEG-4 or H264 video according to your requirement. Here we set it as "iPad H.264 (720p) MPEG4 Video (*.mp4)". You may change the video parameters in the advanced settings, such as bit rate, resolution, frame rate and more.
Step 4: Edit your videos: trim, crop, effect, watermark and deinterlace(optional)
This Aneesoft DVD to iPad video converter for Mac allows you to trim, crop your videos, which may help you removing the black edges around your video, so that you can watch your movies in full screen. You can also set different video effect such as grey, invert, gamma, sepia and so on, in addition, if you want to add watermark on your video, you can click "Watermark" tab and then check "Enable Effect" option box. You may add Text or Image watermark onto your video.
Step 5: Start ripping and converting DVD to iPad supported video format
Finally, click the big "Start" button to start converting DVD to iPad compatible video format. Once the convert is complete, Aneesoft DVD to iPad Converter for Mac will place on your Desktop a new iPad format version of your movies that will play on the iPad. Double-click the new file and play it to make sure it looks as you expect. If you're using the evaluation version of Aneesoft DVD to iPad Converter for Mac, it will only convert the first five minutes of your movies. You need to register it as a full-version to remove this limitation.
Step 6: Make these videos syncing to iPad
After converting DVD to iPad compatible formats, now we can import the converted files to iPad.First, you need to launch iTunes, click File option on menu, and add your converted files to iTunes library. Then, connect your iPad 4 to computer via USB cable, iTunes will detect your iPad. After that, click iTunes "File -> Sync iPad", and the files will be transferred to your iPad from iTunes library. When updating completed, you will find the videos on you iPad. Well, you can enjoy the movie on your IPad now.
You may be interested in these topics:
How to convert FLV to iPhone video
How to convert YouTube to iPhone 4 video
How to use HandBrake to rip your DVDs to iPhone for free
Best multiplayer iPad games for free download
Top 8 best iPad apps for kids
What is iPad supported video, TV & audio format
Jailbreaking for iPad
Apple iPad Frequently Asked Questions
Apple iPad Reviews: Is it as magical as Apple promised
10 iPad features you must know
The worst 10 things about iPad
iPad is best Christmas gift for Christmas 2010
The best holiday movies & Christmas movies for iPad