Thursday, April 19, 2012

How to Free Download YouTube 3D Video Easily


YouTube added an experimental beta feature to its creator tools – 3D conversion. With this tool, any video creator could easily convert a video to 3D format with one click. This feature has been expanded to include users, who can now convert certain 1080p videos into 3D whenever they wish.

When you find a compatible YouTube video and own a special glasses for 3D movies view, all you have to do is to click the “3D” button next to the gear, or in some cases, click the gear itself and choose 3D from the quality options. This will automatically convert the video into 3D format. If we want to free download the 3D video to your computer, then how can we do?

To free download YouTube 3D videos in an easy way, someone may consider installing an add-on YouTube Video downloader app on the browser, which supports to free download YouTube 3D videos to play locally on your computer. But the add-on app will slow down your web.

If you don't want to slow down your brower with add-ons, you may download the stand-alone and free YouTube Downloader. Aneesoft Free YouTube Downloader allows you to free download YouTube 3D videos in FLV, MP4, WEBM, F4V…formats on Windows PC. It’s usable on Windows XP (SP2 or later), Windows Vista, Windows 7. Setting video quality is offered, such as HD 1080P, HD 720P, High Definition, Medium Definition etc. Following is the details on how to free download 3D videos from YouTube 3D Channel with Aneesoft Free YouTube Downloader. 

Steps: How to Free Download YouTube 3D Videos/Movies

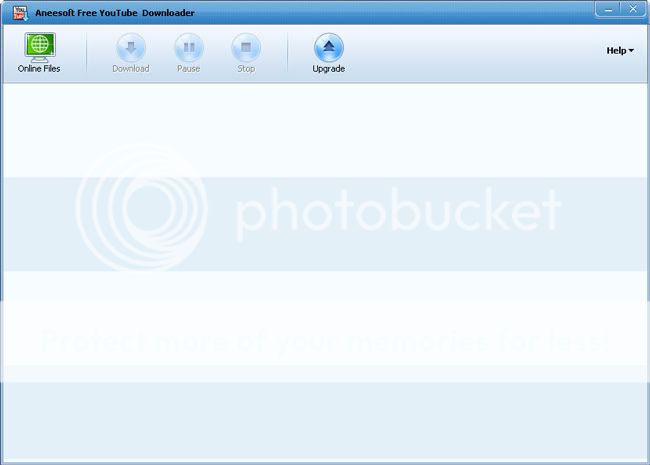
Step 1. Free download, install and open Aneesoft Free YouTube Downloader on your computer, then click the button Online Files.


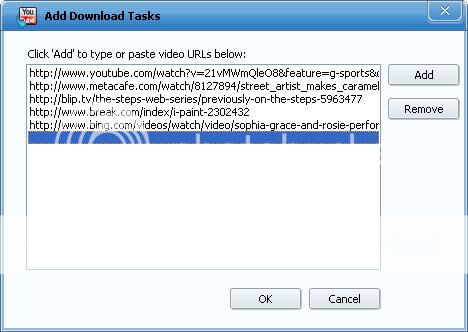
Step 2. Click Add to paste the URL of the online 3D video and click OK to import the videos into the download list.


Step 3(Optional), You can adjust output format, quality, file name, path by clicking the bar of Format, Quality, Save Name, Save Path.


Step 4.Click Download to start downloading all 3D videos.

As you see, it is so easy to free download YouTube 3D videos on PC! Furthermore, if you want to free download YouTube 3D videos on Mac, you can download Aneesoft Free YouTube Downloader for Mac to have a try!

Read more...

How to convert HD 1080P movies to The new iPad on Mac

Get Aneesoft HD to iPad Converter to convert HD videos to The new iPad in full screen for great enjoyment.

As a movie lover I have a boatload of 1080P HD video files on my computer, In order to watch HD 1080P video on The new iPad I have tried many HD video to iPad converters, but many of the ones I tried before had drawbacks, such as processor hang ups and unclear conversion progress monitoring.

During my testing, I found that Aneesoft DVD to iPad Converter for Mac is a very professional iPad HD video converter for Mac users which capable of converting all common HD 1080P videos to iPad without any quality loss. Here I'll show you how to convert HD movies to The new iPad step-by-step.

Things you’ll need

1.Aneesoft HD to iPad Converter for Mac (Free for download trial version)
2.HD video files

Step 1: Download & install Aneesoft HD to iPad Converter for Mac

Aneesoft HD to iPad Converter for Mac is the recommendable software for Mac users to convert HD 1080P Video to The new iPad acceptable format. Click here to free download Aneesoft HD to iPad converter for Mac, install and launch it.

Download Aneesoft HD to iPad converter for Mac


Step 2: Load HD 1080P movies to Aneesoft HD to iPad Converter for Mac

Run HD to iPad Converter for Mac, then click the big button "Add File" to add HD 1080P movies. You may add as many 1080P videos as you want to convert to The new iPad videos. This may take up to a minute or two depending on the contents of the HD 1080P movies and the speed of your optical drive.


Step 3: Edit HD 1080P movies: trim, crop, add effect, add watermark (Optional)

To personalize your HD 1080P movies you may add a watermark for your HD movies in Aneesoft HD to iPad Converter for Mac. Just select the HD 1080P movies which you'd like to add watermark, then click the button 'Edit' to launch video editing window. If you want to crop video or add some special effects, click the first two tabs.


Step 4: Set Output settings to convert HD 1080P movies to The new iPad on Mac

Set Profile from the Profile drop-down list and select output folder to save your converted HD 1080P video files. Remember that the output file size and converting speed mostly depends on the Bitrate you set. Larger Bitrate, larger file size and longer conversion time.


Step 5: Start converting HD 1080P movies to The new iPad video format on Mac

Now you may click the big button "Start" to begin converting HD 1080P movies to The new iPad video files on Mac. Once the convert is complete, Aneesoft HD to iPad Converter for Mac will place on your Desktop a new iPad format version of your video that will play on The new iPad. You can copy the output HD 1080P movies to The new iPad and enjoy it comfortably on a cozy sofa!

Read more...

Tuesday, March 20, 2012

How to Stream 1080p Videos to Apple TV

Use the easiest way to stream 1080p videos to Apple TV

The latest Apple TV supports for 1080P videos, which is the biggest difference from its previous generation predecessors! The updated Apple TV also highlights iCloud features, including Photostream. The new Apple TV also supports iTunes in the Cloud, which now includes Movies in the Cloud. So any movie purchases you make on iTunes will be instantly available for Apple TV.


If you are HD 1080P videos crazy fans and are looking for the ways to stream 1080P videos to your Apple TV, this article is written to tell you how to stream online 1080P videos and local 1080P videos to Apple TV.

Part 1: Stream online 1080P videos to Apple TV with Netflix App

New third generation Apple TV users just need two steps to stream online 1080P videos to Apple TV using Netflix on Apple TV.

Step 1: Sign up with the service ($8 per month) via Netflix.com.
Step 2: Log in your iTunes account and pay the billing via .
After paying, you can watch thousands of hours of movies and TV streaming on Netflix in 1080P with room-filling Dolby Digital 5.1 audio on Apple TV.


Part 2: Stream local 1080P videos to Apple TV with converter software

Apple TV directly supports H.264 video in .m4v, .mp4, and .mov file formats, MPEG-4 video in .m4v, .mp4, and .mov file formats, and M-JPEG in .avi file format. So if your local 1080P videos are Apple TV supported file formats, you just directly play them with Apple TV. If your 1080P videos cannot directly play by Apple TV, like .vob, .flv, .mts, .m2ts, .asf, .3gp, dv, mkv etc., you can first convert them to Apple TV video format on Mac with Apple TV Video Converter for Mac, then sync the converted 1080P videos to Apple TV with iTunes. If you are not familiar with the conversion steps, refer to the below steps.

Step 1: Download and install Apple TV Video Converter for Mac on your Mac (free trial version is offered). Launch it, its main interface appears as below.


Step 2: Import 1080p videos to the Apple TV Video Converter for Mac by clicking “Add File” button. You can highlight the file you want to convert. If it is necessary, you can double click the each file to edit the video, such as trim, crop, add watermark and effect and more.

Step 3: Click on the dropdown menu of “Output Format” to select an output format for Apple TV. You can also reset the output video audio quality by pressing “Setting” icon to go into its interface. Then you can customize the output folder by clicking “Destination” browse icon.

Step 4: Start to convert 1080p video to Apple TV video by pressing “Convert” button.
Once the 1080p video to Apple TV conversion is done, you can sync and stream the converted 1080p video to Apple TV via iTunes.

Tip
If you want to convert 1080P videos to Apple TV on Windows, you can turn to Apple TV Video Converter designed for Windows PC. The steps of streaming 1080p videos to Apple TV are the same as on Mac.

Read more...

How to free download YouTube videos to iPad formats

Get Aneesoft Free YouTube Downloader to free download YouTube videos to iPad formats.

YouTube is a prominent video sharing website for users to upload, watch and share videos. It’s one of the most popular websites that offer streaming videos. If you got an Apple iPad like iPad 2 or The new iPad, it’s really wonderful that you can view amazing YouTube videos on your big and high-resolution iPad screen anywhere you go. But it’s well known that YouTube does not support free download, then many people ask how to free download YouTube videos to iPad video formats support.

Well, you can free download YouTube videos to iPad MP4 formats by simply copying and pasting the URLs of the YouTube video page with Aneesoft Free YouTube Downloader. You just need to click several buttons to free download YouTube videos to iPad formats.

Tutorial: How to free download YouTube videos to iPad formats

Step 1. Go to youtube.com and open the YouTube videos you want to download. Copy the URLS from your browser address bar.

Step 2. Run the Free YouTube Downloader software. Click the “Online Files” button to open “Add Download Tasks” interface, then click “Add” icon to paste YouTube video URLs one after another to the Video Link field, then click OK button. You will see the list of all added YouTube videos are loaded into the program.


Step 3. From “Format” drop down list select “MP4” as output format which is one of iPad supported formats. Besides, you can customize the quality, save path, and save name videos as well.

Step 4. Click “Download” button to start download YouTube videos to iPad format. The process status can be seen intuitively from the “Status”. When it completes, you can get the downloaded YouTube videos in mp4 format by clicking the “Folder” button besides the “Save Path” bar and then transfer them to your iPad via iTunes.
Have you got how to free download YouTube videos to iPad formats? Just to download Aneesoft Free YouTube Downloader to help you.

Hints: If the Free YouTube Downloader cannot help you, please turn to Aneesoft iPad Video Converter and refer to this tutorial: How to convert YouTube videos to iPad after downloading YouTube videos.

Read more...

Tuesday, February 28, 2012

Convert VOB videos to Kindle Fire formats, play VOB files on Kindle Fire

Read the guide to learn how to convert VOB video formats to Kindle Fire formats.

For most people, tablet is used for watching movies. There are a few features that really make Amazon Kindle Fire stand out from the tablets. Price is a big deal, of course. Amazon affords to sell the Kindle Fire at just $199, 60% lower than iPad, and much lower than any Android tablet. Kindle Fire has a 7 inch display with resolution 1024*600. So the playback won’t be too bad.

But it still has format limitation. According to reviews, it only supports mp4, vp8. So you cannot play AVI, MKV, MPG, TS, VOB etc files properly on Kindle Fire. In that case, to play these videos on Kindle Fire, you need to convert them to H.264 or MPEG-4 encoded format first.

Here I would share with you a good way that will quickly help you convert VOB videos to Kindle Fire on Windows using Aneesoft Kindle Fire Video Converter.

Well, let’s see the step by step guide on how to convert VOB files to Kindle Fire on Windows.


Step1. Add VOB files into the converter software

Download install and launch the VOB to Kindle Fire converter.  Click "Add" button to add VOB video files that you would like to convert.

Step2. Set Profiles

Click "Profile" drop down list to choose Amazon Kindle Fire H.264 video(*.mp4) or Amazon Kindle Fire MPEG-4 video(*.mp4) or Amazon Kindle Fire (720p) H.264 video(*.mp4) or Amazon Kindle Fire (1080p) H.264 video(*.mp4) as Profile.

Step 3: Customize video and audio settings to fit for Kindle Fire perfectly

Aneesoft Kindle Fire Video Converter enables users to adjust video and audio parameters to customize the output file quality. Click “Settings” button, then you will be able to adjust all the settings in the following window, including codec, resolution, bit rate, frame rate, sample rate and audio channel.


Step4. Convert VOB to Kindle Fire MP4 video

The final step is to click "Start" Button to start the VOB to Kindle Fire conversion.

If you are using Aneesoft kindle fire video converter to convert VOB files to Kindle Fire video formats, you will find this video converter also allows you to edit videos, such as crop video screen size, crop aspect ratio, merge multiple videos into one, add text/image watermark, and adjust effects/brightness/contrast and so on.

You may also like:

What is Kindle Fire supported formats

Read more...

How to Convert AVCHD to MOV

Read the step-by-step guide to learn how to convert AVCHD video to MOV video.

Knowledge

What's AVCHD

AVCHD - Advanced Video Codec High Definition, is a format for the HD camcorder (Sony and Panasonic) and camera recording and playback. AVCHD video is MPEG-4 AVC/H.264 video compression, that allows the large data files created by HD video recording to be captured and saved on digital media such as hard disk drives and flash memory cards, or DVD disc.

What’s MOV

MOV video is common multimedia format using a proprietary compression algorithm developed by Apple Computer, compatible with both Macintosh and Windows platforms.

How to convert AVCHD to MOV files? Aneesoft AVCHD Converter provides a fast and easy way to convert AVCHD to MOV format with high quality. With the AVCHD to MOV converter, you can turn your recorded AVCHD videos to MOV format and watch them on QuickTime, iTunes, iPad, iPhone etc. Apart from that, other formats also supported!

Here is the guide to show you how to convert AVCHD to MOV.


Add files: Press Add Files button to load AVCHD files to the AVCHD to MOV converter program. Click the name of the file, then press the Play button to preview it.

The functional AVCHD to MOV converter can let you merge several of your files into one. Choose the files you want to merge, then press the Merge button. This AVCHD converter also can let you edit your files. Choose the files you want to edit, then press the Edit button.


Select output format: Choose the files in the file list, and open Output Format drop-down list, then select the MOV format. Set a folder to store your converted MOV files in Destination bar.

Personalize your converted files: To adjust the output settings, click Settings button below Output Format drop-down list, and set the resolution, bitrate, frame rate, sample rate etc. as you like.

Convert: Click at the Start bottom to start converting AVCHD to MOV. Aneesoft AVCHD Converter will run fast in AVCHD to MP4 conversion, taking advantage of its support for batch and multiprocessing.

Read more...

Thursday, February 9, 2012

Valentine’s Day Gift Idea-Burn DVD for Valentine’s Day Gift

Valentine's Day is getting closer and closer and you have been thinking about Valentine’s Day gift ideas-how to get romantic gifts for Valentine’s Day? You can never go wrong with jewelry like necklaces, rings, pendants, earrings, bracelets, chains. Another romantic Valentine’s Day gift idea could be going out for burning your own DVD that would be unforgettable for him or her. Using profession DVD creator software to make/burn your love DVD as a personal love confession is better than the hand-made gift.

Burn DVD with your love video clips from HD camcorder you recorded before or from YouTube you download or from your video collections and with your lover’s favorite song or a dialog you’ve recorded added as the background audio.

For burning a high-quality DVD with more practical and useful DVD creating features, I recommend Aneesoft DVD Creator. It can burn almost all videos to DVD disc like AVCHD (camcorder), AVI, MP4, WMV, MKV, MOV, MPEG, FLV, VOB etc. You needn't make video conversion before burning them to DVD. What’s more, this DVD creator is built in video editing tool which allows you to crop for removing the unwanted parts, trim video to save your favorite clips, add text/ image watermark or add special effects to make your videos very personalized and more.

Burn your love DVD for Valentine’s Day gift

After lunching the DVD creator software, click the “Add” button to load video files for creating, and select the video you want to edit, such as trimming, cropping, applying effect, adding watermark etc.


This DVD creator’s “Menu” is a good way to express your love. You are allowed to add background image or your couple photos to decorate your DVD menu by pressing "Background". Also, you can write your love words to your lover by clicking "Text". What's more, you can use the song he or she loves the most as the background music by pressing "Add Music" and you can edit the audio, such as trimming, fading in/out etc. It’s sure that the burned DVD will be impressive when she or he saw it.


After all is done, get to start burning Valentine's Day DVD.

The last but not the least is to remember to wrap your love DVD with a nice package and lovely words. I believe burn your love DVD for Valentine's Day gift absolutely will be a romantic gift idea and absolutely will surprise her.

Other Valentine's Day gift idea:

Make Valentine's Day flash photo gallery

Read more...

Wednesday, February 1, 2012

Play 720p video on iPad

Can iPad play 720P videos? With maximum screen resolution 1024×768 pixels and 4:3 ratios, iPad can play 720P video in H.264 or MPEG-4 or M-JPEG format. To play any 720p video on iPad, sometimes we need to convert unsupported video files to iPad format in 720P.Then how to convert video to iPad 720P video? It can be done by Aneesoft iPad Video Converter easily and quickly. See the following steps.


Step 1: Load video files into the program

Click “Add File” to load videos that you want to play on iPad. You can load almost all videos, such as AVCHD, 1080p videos, HD videos and SD videos.

Step 2: Set output options for iPad

To play 720p video on iPad, click the “Profile” drop down list, and select “iPad 720P H.264 Video(*.mp4)” as output. Also you can click “Customize video settings” icon to set best settings for the output video quality, such as codec, bit rate, frame rate, sample rate, channel. Of course you can freely set the output path.

Step 3: Start converting videos to iPad 720P

When all your need settings are done, click “Start” button to start videos to iPad 720P conversions.

After the conversion is completed, you can sync the converted videos to my iPad via iTunes. Then, you can play the 720p video on iPad for joy.

Tips: besides converting videos to iPad 720p video, Aneesoft iPad video converter also provides easy video editing functions, such as merge video files, trim segments of video, crop video screen size and aspect ratio, add watermark, apply effect, set contrast and brightness and more.

Related articles:
iPad 3 VS iPad 2
Top iOS apps for iPad
Use built-in YouTube app for iPad and download YouTube videos to iPad
Top 10 best Christmas iPad games for holiday season 2011
Best Christmas movies for iPad 2010

Read more...

Thursday, January 12, 2012

Enjoy DVD movies on Kindle Fire

Wish to watch DVD movies on Kindle Fire? But have no thought how to convert DVD to Kindle Fire or what is the best DVD Ripper for Kindle Fire? Aneesoft DVD to Kindle Fire Converter is the top 1 downloads and is your best choice now to convert rip DVD movies to Kindle Fire formats.


Aneesoft DVD to Kindle Fire Converter is a stable DVD Ripper that can quickly, easily help you rip DVD movies to Kindle Fire formats with excellent quality.  This DVD ripper for Kindle Fire supports DVD editing, such as trim DVD segments, crop area size of the video, crop aspect ratio, set brightness/contrast/effect of the video, add text/image watermark and so on.

Aneesoft DVD to Kindle Fire Converter has been the top 1 DVD converter software for the purpose to rip DVD to Kindle Fire video format such as MPEG-4, H.264 on Windows or Mac OS X(Lion 10.7 included), you can also convert DVD to avi, mpg, wmv, mov, asf, 3gp, vob, mp4 etc.The DVD ripper software makes it possible to get your favorite DVDs to Kindle Fire without having to carry DVD disc on travel.
How to convert DVD to Kindle Fire with Aneesoft DVD to Kindle Fire Converter?
Quick guide: convert DVD movies onto Kindle Fire


Step 1: Place your DVD to computer. Start the DVD to Kindle Fire Converter software. Load DVD to the program. You can preview the movie and snapshot your favorite still images. Also, you can edit the movie as you wish to make your own movie, such as trim, crop, add watermark, set effect/brightness/contrast, deinterlace etc. All these are up to you!

Step 2: Choose Amazon Kindle Fire H.264 video(*.mp4) or Amazon Kindle Fire MPEG-4 video(*.mp4) or Amazon Kindle Fire (720p) H.264 video(*.mp4) or Amazon Kindle Fire (1080p) H.264 video(*.mp4) as Profile. Also, you can set the output quality for your Kindle Fire by pressing the Setting button to adjust the parameters of resolution, bit rate, frame rate, sample rate, and channel!

Step 3: Start conversion. Hit the Start button to convert DVD to Kindle Fire.
Now you have learned how to convert DVD to Kindle Fire on Windows or Mac, and now you can enjoy DVD movies on Kindle Fire wherever you go!

You may also like:

Top free apps for Kindle Fire
Watch 1080P/720P HD videos on Kindle Fire
What is Kindle Fire supported formats
How to play VOB videos on Kindle Fire

Read more...

Monday, January 9, 2012

Play AVCHD (MTS/M2TS) onto Amazon Kindle Fire

You got an AVCHD camcorder such as Panasonic HDC-SD9, Sony Handycam HDR-CX550V, Canon Vixia HF S21, Canon HF10, Sanyo Xacti, JVC GZ-HD 10 etc.? It’s a straightforward way to create AVCHD MTS/M2TS files with these HD camcorders.

The brand new Amazon Kindle Fire, iPad’s top rival, comes with a 7" multi-touch gorilla glass display with IPS technology to provide an extra wide viewing angle, making watch videos with a resolution of 1024*600 and a vivid experience.

Kindle Fire is an ideal devices to playback the AVCHD videos! Unfortunately we cannot directly import AVCHD videos to Kindle Fire because it only supports MP4 and VP8 video files. To perfectly playback AVCHD videos on Kindle Fire, we should convert AVCHD to Kindle Fire MP4 with first.


Best solution to fast play AVCHD videos on Kindle Fire


Step 1: Run the installed AVCHD to Kindle Fire program; hit the "Add Files" button to import the AVCHD videos from camcorder.

Step 2: Choose Amazon Kindle Fire H.264 video(*.mp4) or Amazon Kindle Fire MPEG-4 video(*.mp4) or Amazon Kindle Fire (720p) H.264 video(*.mp4) or Amazon Kindle Fire (1080p) H.264 video(*.mp4) as output format. If you wanna edit the video files to make your own creative movie, click the “Edit” button and click the “Setting” button to adjust video and audio parameters for the output video.

Step 3: Click the "Start" button to start converting AVCHD videos to Kindle Fire MP4. After that, connect Kindle Fire to your computer, then transfer the converted AVCHD videos to Kindle Fire for playback.

Read more...