Monday, October 18, 2010
How to rip, convert DVD movies to iphone 4, iPad, iPod on Mac
Hello, I am a apple enthusiast, recently, I found a new brand "Aneesoft" when I read daily news, I found that many Apple fans are using the Aneesoft products and give a high evaluation. Then I am very curious about this brand, I search from the Google and found this website home, there are so many Apple auxiliary tools and practical tutorials. Below is the company introduction: Aneesoft is dedicated to developing and providing easy and affordable multimedia software for both Windows and Mac users, including video converting, DVD ripping tools and digital photography software for all the users around the world. Aneesoft.com is constantly trying to expand into more forms of multimedia software for users. They will keep improving the functions and performance of our products. They believe that with your support, Aneesoft of much higher quality and stability is just around the corner.
That is so great! I download some products and read many tutorial on iPhone, iPad and iPod, it really a huge treasure for us Apple fans. At last, I recommend a good tutorial to every apple user, which shows how to rip or convert DVD movies to iPhone 4 or convert video to iPhone 4 easily.
Things you'll need
1. Apple media device - iPod, iPad, iPhone
2. Aneesoft DVD Ripper Pro for Mac (If you are using Windows OS, please download Aneesoft DVD Ripper Pro)
3. iTunes installed on your computer
4. DVD video files
Step1. Run Aneesoft DVD Ripper Pro for Mac and load DVD disk to convert
Download and install Aneesoft DVD Ripper Pro for Mac on your PC, launch setup and follow instructions on screen. Then run the DVD Ripper Pro in the following main window, click "Load..." button on the toolbar to add videos that you want to convert to Apple media device video formats.
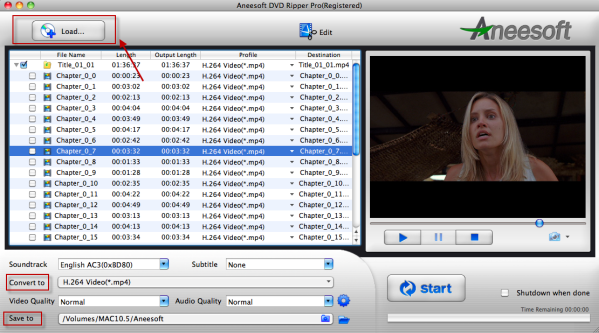
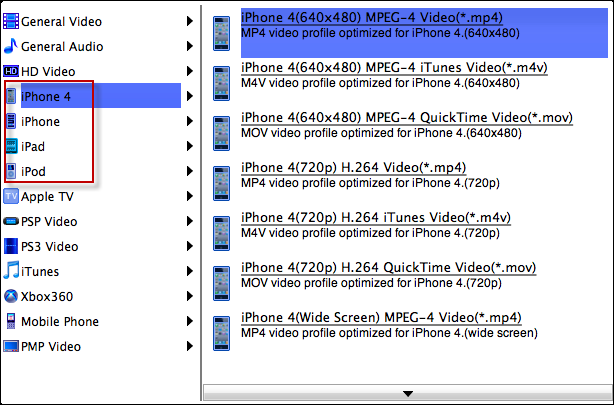
Step2. Output Setup
Choose the most suitable output settings you want.
Step3. Start ripping and converting DVD
Finally, click the big "Start" button to start converting DVD. The Convert progress bar shows you how much of the convert process is completed.
Step4. Make these videos syncing to iPhone 4, iPad, iPod
After convert DVD videos to iPhone 4, iPad, iPod compatible formats, now we can import the converted files to iPhone 4, iPad, iPod.
First, you need to launch iTunes, click File option on menu, and add your converted files to iTunes library. Then, connect your media device to Mac computer via USB cable, iTunes will detect your media device. After that, click iTunes "File -> Sync iPhone (iPad, iPod)", and the files will be transferred to these devices from iTunes library. When updating completed, you will find the videos on you media device.
Edit your video file (optional): trim, add effects, add watermark and deinterlace

Crop Video:
To watch your movies in full screen, you may crop videos to remove the black edges around your video with this Aneesoft DVD Ripper Pro for Mac. Click "Crop" tab to open the Crop Video window, and then check the "Enable Crop" option box. There are two methods available to crop your video: crop by a adjusting the crop frame and crop by setting the crop values. After you select an output aspect ratio and finish the crop, you can preview the final visual effect on the right "Output Preview" in real-time.
Set Effect:
If you want to adjust the video effect of your movie, you can click the "Effect" tab and then check "Enable Effect" option box. Drag each effect adjustment slider to set the video brightness and contrast. You can also choose a special effect from the Effect drop-down list to apply to your movie.
Add Watermark:
If you want to add watermark on your video, you can click "Watermark" tab and then check "Enable Effect" option box. You may add Text or Image watermark onto your video. If you want to add Text watermark for your video, click the Color or Font button to set the color and font your text. Drag and drop the text to anywhere you want. If you want to add image watermark, just check the Image option and select the image you want to add as watermark.
Deinterlace:
To remove the DVD movies black sides, just click the "Deinterlace" tab and then check "Enable Deinterlace" box, set up the Start time and End time.
No comments:
Post a Comment